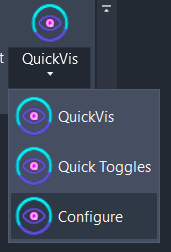
QuickVis Configure
QuickVis Configure lets you personalize how the radial menu presets and quick toggles panel work. Define exactly which categories each preset mode shows or hides, and choose which toggles appear in the dockable panel.
Getting Started
Section titled “Getting Started”Access Configure from the QuickVis split button dropdown on the Amorphous ribbon tab in the View Tools panel.
The Settings Window
Section titled “The Settings Window”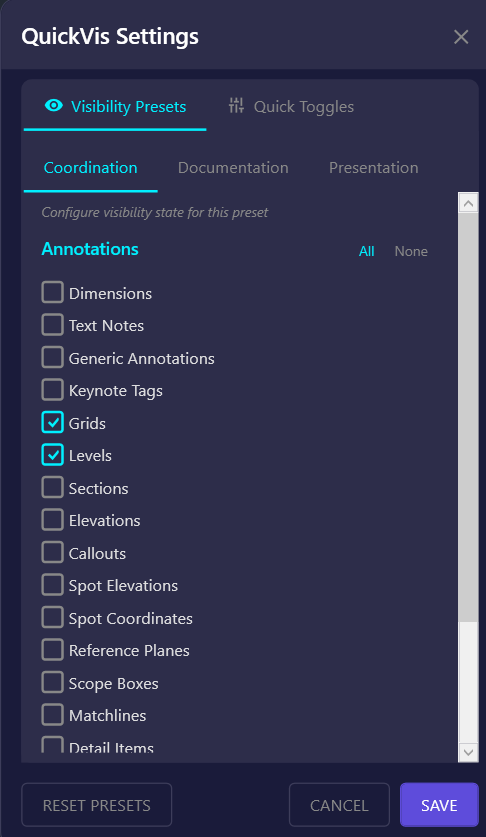
The settings window has two tabs:
| Tab | Purpose |
|---|---|
| Visibility Presets | Configure what each preset mode shows or hides |
| Quick Toggles | Customize which toggles appear in the dockable panel |
Visibility Presets Tab
Section titled “Visibility Presets Tab”Configure the three customizable preset modes: Presentation, Documentation, and Coordination for QuickVis.
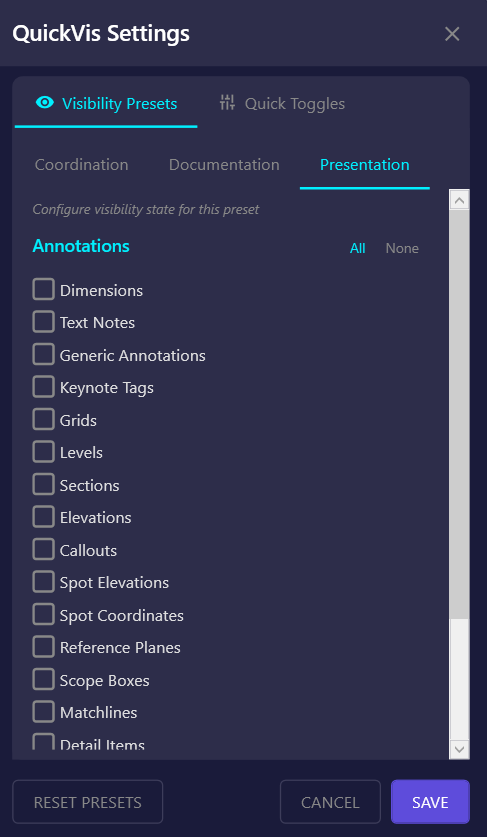
Selecting a Preset
Section titled “Selecting a Preset”- Click the preset name tab (Presentation, Documentation, or Coordination)
- The checkbox grid updates to show that preset’s current settings
- Make changes to the checkboxes
- Click Save to apply
Annotation Categories
Section titled “Annotation Categories”Control visibility for standard Revit annotation categories:
| Category | Description |
|---|---|
| Dimensions | All dimension types |
| Text Notes | Text annotations |
| Generic Annotations | Symbol-based annotations |
| Keynote Tags | Keynote annotations |
| Grids | Grid lines |
| Levels | Level markers |
| Sections | Section cut markers |
| Elevations | Elevation markers |
| Callouts | Callout regions |
| Spot Elevations | Spot elevation annotations |
| Spot Coordinates | Spot coordinate annotations |
| Reference Planes | Reference planes |
| Scope Boxes | Scope box outlines |
| Matchlines | Matchline markers |
| Detail Items | 2D detail components |
Checkbox states:
- Checked = Category will be visible when preset is applied
- Unchecked = Category will be hidden when preset is applied
Element Types
Section titled “Element Types”Control visibility for element types that use element-level hiding:
| Element | Description |
|---|---|
| CAD Imports (DWG) | Imported DWG files |
| Point Clouds | Point cloud instances |
| Revit Links | Linked RVT models |
Quick Actions
Section titled “Quick Actions”| Button | Action |
|---|---|
| All | Check all boxes (everything visible) |
| None | Uncheck all boxes (everything hidden) |
Example Configurations
Section titled “Example Configurations”Presentation Preset
Section titled “Presentation Preset”For clean presentation views:
- Uncheck: Dimensions, Text Notes, Grids, Levels, Sections, Elevations, Callouts, Reference Planes, Scope Boxes, Matchlines
- Uncheck: CAD Imports, Point Clouds, Revit Links
- Check: (leave empty or keep only essential items)
Documentation Preset
Section titled “Documentation Preset”For construction documents:
- Check: Dimensions, Text Notes, Keynote Tags, Grids, Levels, Spot Elevations
- Check: Sections, Elevations, Callouts (view markers)
- Uncheck: CAD Imports, Point Clouds, Revit Links (typically hidden for CDs)
Coordination Preset
Section titled “Coordination Preset”For coordination reviews:
- Check: Grids, Levels, Revit Links, Point Clouds
- Uncheck: Most annotations (Dimensions, Text Notes, etc.)
- Keep: Scope Boxes, Section Box for orientation
Quick Toggles Tab
Section titled “Quick Toggles Tab”Customize which toggles appear in the Quick Toggles Panel.
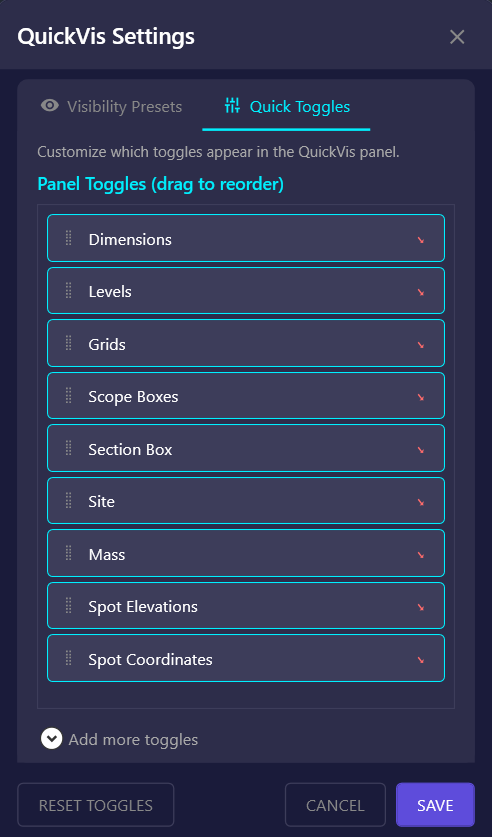
Active Toggles
Section titled “Active Toggles”The top section shows toggles currently in your panel, in order:
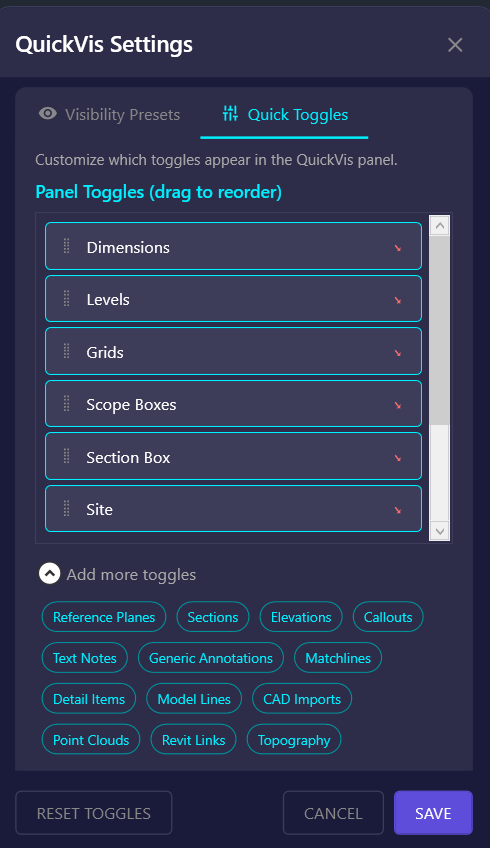
| Element | Action |
|---|---|
| Drag handle | Click and drag to reorder |
| Toggle name | The category this toggle controls |
| X button | Remove from panel |
Reordering Toggles
Section titled “Reordering Toggles”- Click the drag handle (left side of toggle)
- Drag up or down to the desired position
- Release to drop in place
- Click Save to apply the new order
Removing Toggles
Section titled “Removing Toggles”- Click the X on the right side of the toggle
- The toggle moves to the “Available” section
- Click Save to apply
Adding Toggles
Section titled “Adding Toggles”- Expand “Add More Toggles” (click to show available categories)
- Click a category to add it to Active Toggles
- It appears at the bottom of your active list
- Drag to reposition if needed
- Click Save to apply
Available Toggle Categories
Section titled “Available Toggle Categories”| Toggle | What It Controls |
|---|---|
| Dimensions | Annotation dimensions |
| Levels | Level datum lines and heads |
| Grids | Grid lines and bubbles |
| Scope Boxes | Scope box boundaries |
| Section Box | 3D view section box clipping boundary |
| Site | Site category, Project Base Point, Survey Point, Internal Origin |
| Mass | Conceptual mass forms |
| Spot Elevations | Spot elevation annotations |
| Spot Coordinates | Spot coordinate annotations |
| Reference Planes | Reference plane lines |
| Sections | Section view markers and heads |
| Elevations | Elevation view markers |
| Callouts | Callout boundary markers |
| Text Notes | Text annotation elements |
| Generic Annotations | Generic annotation family instances |
| Matchlines | Matchline elements for sheet coordination |
| Detail Items | 2D detail components |
| Model Lines | Model lines (3D lines in model space, not view-specific) |
| CAD Imports | Imported DWG/DXF files |
| Point Clouds | Point cloud instances |
| Revit Links | Linked Revit models |
| Topography | Topography surfaces; also Toposolids in Revit 2024+ |
Saving Settings
Section titled “Saving Settings”Click Save at the bottom of the window to apply all changes. Settings are stored in:
%AppData%\Amorphous\QuickVis\settings.jsonSettings persist across Revit sessions and are user-specific.
Resetting to Defaults
Section titled “Resetting to Defaults”Using the Reset Buttons
Section titled “Using the Reset Buttons”The easiest way to reset settings:
- Visibility Presets: Click Reset Presets to restore all presets to their default configurations, then click Save
- Quick Toggles: Click Reset Toggles to restore the default toggle list and order, then click Save
Manual Reset
Section titled “Manual Reset”If the reset buttons don’t work or you want to reset everything at once:
- Close Revit
- Delete or rename the settings file:
%AppData%\Amorphous\QuickVis\settings.json
- Reopen Revit - default settings will be created
Settings Reference
Section titled “Settings Reference”Default Preset Configurations
Section titled “Default Preset Configurations”| Preset | Default Hidden | Default Visible |
|---|---|---|
| Presentation | Most annotations, CAD, Links, Clouds | Essential view elements |
| Documentation | CAD, Links, Clouds | All annotations |
| Coordination | Most annotations | Grids, Levels, Links, Clouds |
Default Quick Toggles
Section titled “Default Quick Toggles”In order of appearance:
- Dimensions
- Levels
- Grids
- Scope Boxes
- Section Box
- Site
- Mass
- Spot Elevations
- Spot Coordinates
- Lines
Workflow-Specific Presets
Section titled “Workflow-Specific Presets”Customize presets to match your specific workflows:
- MEP Coordination: Show ducts, pipes, but hide structural annotations
- Client Presentations: Hide all technical annotations, keep relevant elements
- As-Built Documentation: Show point clouds, hide linked models
Minimal Toggle Panel
Section titled “Minimal Toggle Panel”For a cleaner panel, remove toggles you rarely use:
- Keep only the most-used toggles
- Access others through the radial menu presets
Matching Presets to Templates
Section titled “Matching Presets to Templates”Coordinate your QuickVis presets with your view templates:
- Name presets to match template purposes
- Configure the same categories to match template defaults
- Use QuickVis for quick overrides without modifying templates
Troubleshooting
Section titled “Troubleshooting”Settings Not Saving
Section titled “Settings Not Saving”Cause: File permissions or path issues.
Solution: Ensure the Amorphous folder exists and is writable:
%AppData%\Amorphous\QuickVis\Toggles Not Appearing
Section titled “Toggles Not Appearing”Cause: Toggle was removed or settings file is corrupted.
Solution: Add the toggle back from “Add More Toggles”, or reset settings.
Preset Not Working as Expected
Section titled “Preset Not Working as Expected”Cause: Checkbox state doesn’t match intended visibility.
Solution: Remember: Checked = Visible, Unchecked = Hidden. Review and adjust the preset configuration.
Related Tools
Section titled “Related Tools”- QuickVis Radial Menu - Apply preset visibility modes
- Quick Toggles Panel - Dockable toggle panel
- Preferences - Global Amorphous settings