Import VG
Import VG loads Visibility/Graphics settings from a .vgpreset file and applies them to selected views in your project. This command enables you to transfer carefully configured VG settings between projects, share standards with team members, or apply exported settings from a template project to new documents.
Getting Started
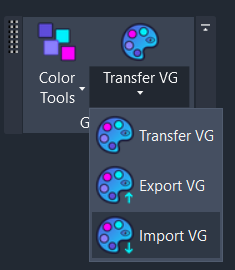
Section titled “Getting Started”Find Import VG on the Amorphous ribbon tab in the Graphics panel, under the VG Manager dropdown menu.
The button is always available when a Revit document is open.
Features
Section titled “Features”- Load VG settings from file - Import settings from
.vgpresetfiles created by Export VG - Source information display - Review original project name, view name, export date, and Revit version before importing
- Selective import - Choose which category types and filters to apply using toggle chips
- Missing filter handling - Configure whether to skip missing filters or create placeholder filters
- Multi-view application - Apply imported settings to multiple target views at once
- Search and filter views - Quickly find target views using the search box
- Results summary - Detailed completion report with warnings for any skipped items
How to Use
Section titled “How to Use”Basic Workflow
Section titled “Basic Workflow”- Click Import VG from the VG Manager dropdown
- Browse to the .vgpreset file you want to import
- Review source information - Verify you’re importing from the correct source
- Select settings to import - Toggle Model Categories, Annotation Categories, and/or Filters
- Configure missing filters - Choose Skip or Create for filters not found in your document
- Select target views - Check the views to receive the imported settings
- Click Import - Settings are applied with a summary of results
Reviewing Source Information
Section titled “Reviewing Source Information”Before importing, the preview dialog displays key metadata about the exported settings:
| Information | Description |
|---|---|
| Source | Name of the project the settings were exported from |
| View | Name and type of the original view |
| Exported | Date and time when the settings were exported |
| Revit | Revit version used to create the export |
This helps you verify you’re importing the correct settings, especially when working with multiple preset files.
Selecting What to Import
Section titled “Selecting What to Import”Use the toggle chips to control which settings are applied:
| Setting | Description |
|---|---|
| Model Categories | Visibility and graphic overrides for model elements (walls, floors, etc.) |
| Annotation Categories | Visibility and graphic overrides for annotations (dimensions, tags, etc.) |
| Filters | View filter visibility, enabled state, and graphic overrides |
Each chip shows a count of available items (e.g., “Model Categories (156)”). Chips are disabled if the preset file contains no items of that type.
Handling Missing Filters
Section titled “Handling Missing Filters”When importing filters, some may not exist in the target document. The Missing filters toggle controls this behavior:
| Setting | Behavior |
|---|---|
| Skip (default) | Filters not found in the document are skipped with a warning |
| Create | Placeholder filters are created with the same name and categories |
Selecting Target Views
Section titled “Selecting Target Views”The target views list shows all printable views in your document (excluding templates). Use the features to find your views quickly:
- Search box - Type to filter by view name or view type
- Checkboxes - Select individual views to receive the imported settings
- View type indicator - Each view shows its type in parentheses (e.g., “FloorPlan”)
User Interface
Section titled “User Interface”Import Preview Window
Section titled “Import Preview Window”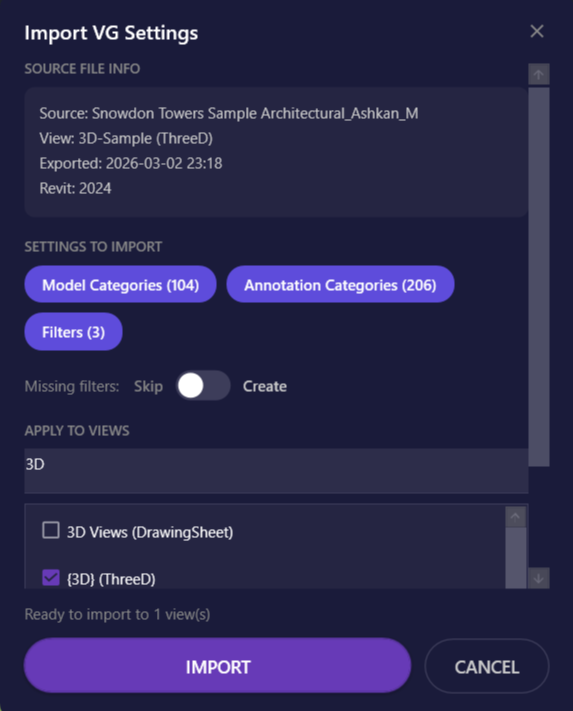
| Element | Description |
|---|---|
| Source File Info | Displays metadata about the exported settings |
| Settings to Import | Toggle chips for Model Categories, Annotation Categories, and Filters |
| Missing filters toggle | Switch between Skip and Create modes |
| Search box | Filter the target views list |
| Target views list | Checkable list of views to apply settings to |
| Status text | Shows current state and readiness to import |
| Import button | Apply selected settings to selected views |
| Cancel button | Close without importing |
Keyboard shortcuts:
| Key | Action |
|---|---|
Enter | Import (when enabled) |
ESC | Close window |
Results Summary
Section titled “Results Summary”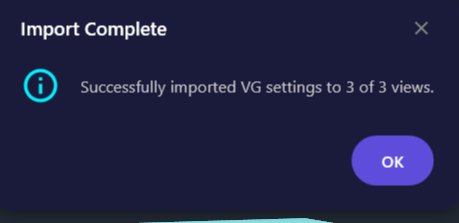
After importing, a summary dialog shows:
- Number of views successfully updated
- Total views attempted
- Warnings for any skipped items (limited to first 10, with count of additional warnings)
Options & Settings
Section titled “Options & Settings”| Option | Description | Default |
|---|---|---|
| Model Categories | Import model category visibility and overrides | On (if available) |
| Annotation Categories | Import annotation category visibility and overrides | On (if available) |
| Filters | Import filter visibility, enabled state, and overrides | On (if available) |
| Missing filters: Skip | Skip filters not found in document | Selected |
| Missing filters: Create | Create placeholder filters for missing items | Not selected |
Tips & Best Practices
Section titled “Tips & Best Practices”- Enable “Create” for new projects - When importing to a new project that doesn’t have the same filters, enable Create to establish the filter placeholders, then configure their rules
- Verify source before importing - Always check the source information to ensure you’re importing from the intended preset file
- Use specific view searches - Type part of a view name or the view type to quickly narrow down the target list
- Import in batches - For large projects, consider importing to related views in groups (e.g., all floor plans, then all sections)
- Review warnings carefully - Warnings indicate patterns or filters that couldn’t be applied; these may need manual attention
- Combine with Transfer VG - Use Export/Import for cross-project transfers; use Transfer VG for same-project transfers
Limitations
Section titled “Limitations”| Limitation | Details |
|---|---|
| View templates excluded | View templates cannot be selected as import targets; settings must be applied to regular views |
| Pattern matching by name | Line patterns and fill patterns are matched by name; if patterns don’t exist in the target document, those overrides are skipped |
| Filter rules not imported | When creating missing filters, only the name and categories are created; parameter rules must be configured manually |
| Project-specific settings excluded | Workset visibility, linked model settings, and point cloud settings are not included in preset files (use Transfer VG for same-project transfers) |
| Cross-version considerations | Some categories may not exist in older Revit versions; these are skipped with warnings |
Troubleshooting
Section titled “Troubleshooting””Filter not found” warnings
Section titled “”Filter not found” warnings”This occurs when the preset file contains filters that don’t exist in the target document.
Solutions:
- Enable Create in the Missing filters toggle to create placeholder filters
- Manually create the filters in your document before importing
- Accept the warnings if those filters aren’t needed in this project
Pattern override warnings
Section titled “Pattern override warnings”Pattern overrides are skipped when the line pattern or fill pattern doesn’t exist in the target document.
Solutions:
- Transfer patterns from the source project using Revit’s Transfer Project Standards
- Create patterns with matching names in the target document
- Accept the warnings if default patterns are acceptable
Category visibility not changing
Section titled “Category visibility not changing”Some categories may not support visibility control in certain view types.
Solutions:
- Verify the category is valid for the target view type
- Check if the category exists in your Revit version
- Review the warnings in the results summary for specific details
Import button disabled
Section titled “Import button disabled”The Import button requires:
- At least one setting type selected (Model Categories, Annotation Categories, or Filters)
- At least one target view selected
Solutions:
- Select at least one toggle chip in the Settings to Import section
- Check at least one view in the target views list
- Review the status text for guidance on what’s missing
No views in target list
Section titled “No views in target list”The target list only shows printable views (not templates).
Solutions:
- Ensure your document has views (not just templates)
- Clear the search box to show all views
- Verify views are not dependent views of another view
Related Tools
Section titled “Related Tools”- Transfer VG - Copy VG settings between views within the same project
- Export VG - Save VG settings to a .vgpreset file
- Template Manager - Manage and apply view templates