Color Tools
Color Tools provides two powerful features in a unified interface: color-code elements in your active view based on various criteria, and run quality assurance checks that highlight issues in red for immediate visibility. Whether you need to visualize model organization for coordination meetings or identify modeling issues before submitting deliverables, Color Tools streamlines these common workflows.
Getting Started
Section titled “Getting Started”Find Color Tools on the Amorphous ribbon tab in the Graphics panel.
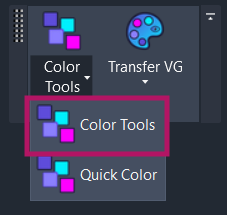
The split button provides two options:
- Color Tools (main button): Opens the modeless dialog with Color by Filter and QA Checker tabs
- Quick Color (dropdown): Opens a radial marking menu for rapid color assignment
Features
Section titled “Features”- Multiple colorization modes - Color by Category, Type, Family, Workset, Phase Created/Demolished, Level, MEP System (Classification/Type/Name), or Connected Runs
- Category override modes - Choose between fast V/G category overrides or precise per-element overrides
- Adjustable transparency - Apply transparency (0-100%) with quick preset buttons
- Six QA quality checks - Identify unhosted elements, orphaned hosts, unconnected MEP, sloped/flat pipes, in-place families, and duplicates
- Visual issue highlighting - QA issues are highlighted in red; click the count to select flagged elements
- Keyboard shortcuts - Hotkey access to all colorization options when the dialog has focus
- Session memory - Dialog position, transparency settings, and selected options persist within your Revit session
- Modeless operation - The dialog stays open while you work, allowing multiple operations without reopening
How to Use
Section titled “How to Use”Color by Filter Tab
Section titled “Color by Filter Tab”- Open the dialog - Click the Color Tools button on the ribbon
- Select a colorization mode - Click one of the chip buttons:
- Basic modes: Category, Type, Family, Workset, Phase
- Spatial modes: Level
- MEP modes: MEP System, Connected Run
- Adjust settings (optional):
- Use the transparency slider (0-100%) or quick presets (0%, 25%, 50%, 75%)
- Click the gear icon for advanced settings
- Click APPLY or press
Enter - Elements in the active view are colored based on your selection
Clearing Color Overrides
Section titled “Clearing Color Overrides”Two clear options are available:
| Button | Hotkey | Action |
|---|---|---|
| Clear Selected | S | Removes color overrides from currently selected elements |
| Clear All | R | Removes all color overrides in the active view |
QA Checker Tab
Section titled “QA Checker Tab”- Switch to the QA Checker tab - Click the “QA Checker” tab header
- Select scope:
- Active View - Check all elements visible in the current view
- Selection - Check only the currently selected elements
- Select a check type:
- Hosting: Unhosted Elements, Orphaned Hosts
- MEP: Unconnected, Sloped/Flat
- Geometry: In-Place Families, Duplicates
- Click APPLY
- Issues are highlighted in red and the count is displayed
- Click the result count to select all flagged elements in Revit
User Interface
Section titled “User Interface”Color by Filter Tab
Section titled “Color by Filter Tab”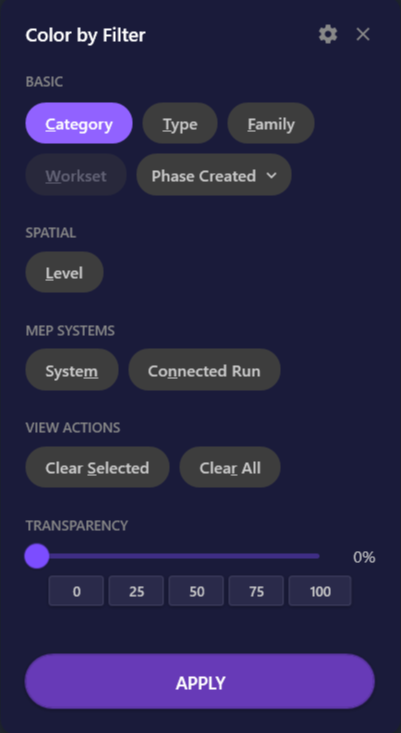
| Element | Description |
|---|---|
| Mode chips | Select the colorization criterion (one at a time) |
| Clear Selected | Remove overrides from selected elements only |
| Clear All | Remove all overrides in the active view |
| Transparency slider | Set override transparency (0-100%) |
| Quick presets | One-click transparency values (0%, 25%, 50%, 75%) |
| Settings button (gear icon) | Open advanced settings |
| APPLY button | Execute the colorization |
Colorization Modes
Section titled “Colorization Modes”| Mode | Hotkey | Description |
|---|---|---|
| Category | C | Colors elements by their Revit category |
| Type | T | Colors elements by their element type |
| Family | F | Colors elements by their family |
| Workset | W | Colors elements by their workset assignment |
| Phase | P | Colors elements by Phase Created or Phase Demolished |
| Level | L | Colors elements by their associated level |
| MEP System | M | Colors elements by MEP system classification, type, or name |
| Connected Run | N | Colors connected MEP runs (ducts, pipes, conduits) |
Phase Mode Dropdown
Section titled “Phase Mode Dropdown”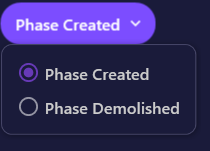
Click the Phase chip to reveal the dropdown with two options:
| Option | Description |
|---|---|
| Phase Created | Match elements by their creation phase |
| Phase Demolished | Match elements by their demolition phase |
MEP System Dropdown
Section titled “MEP System Dropdown”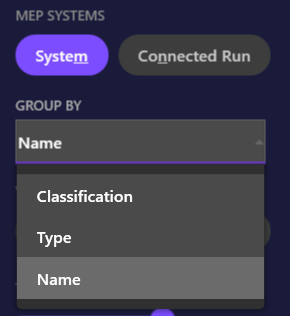
Click the MEP System chip to reveal grouping options:
| Option | Description |
|---|---|
| Classification | Group by system classification (e.g., Supply Air, Return Air) |
| Type | Group by system type definition |
| Name | Group by individual system name |
Connected Run Dropdown
Section titled “Connected Run Dropdown”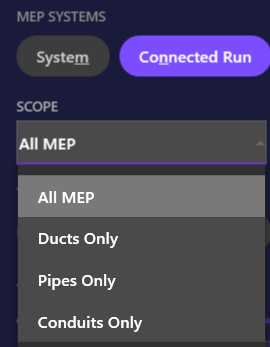
Click the Connected Run chip to filter by discipline:
| Option | Description |
|---|---|
| All MEP | Color all connected MEP elements |
| Ducts Only | Color only duct runs |
| Pipes Only | Color only pipe runs |
| Conduits Only | Color only conduit runs |
Settings Panel
Section titled “Settings Panel”
Click the gear icon to access advanced settings:
| Setting | Options | Description |
|---|---|---|
| Category Mode | V/G Category / Per Element | V/G is faster; Per Element is more precise |
| Slope Threshold | Numeric value | Minimum rise to count a pipe as sloped (QA Checker) |
| Duplicate Tolerance | Numeric value | Maximum distance to flag as duplicate (QA Checker) |
QA Checker Tab
Section titled “QA Checker Tab”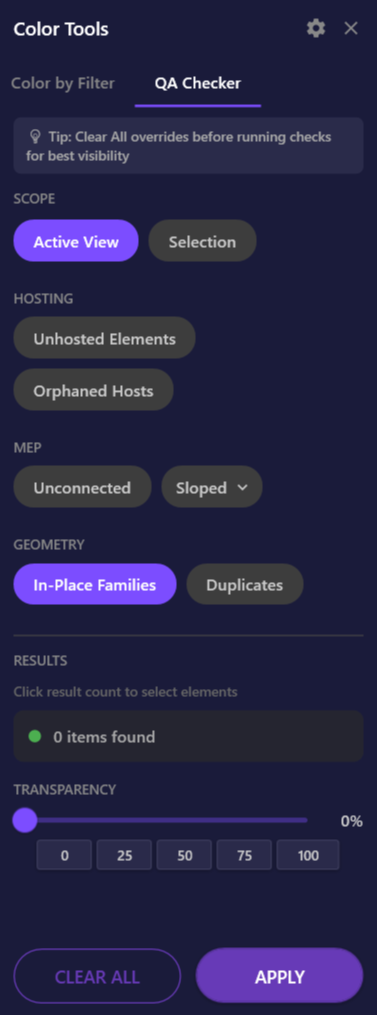
| Element | Description |
|---|---|
| Scope chips | Choose Active View or Selection |
| Hosting checks | Unhosted Elements, Orphaned Hosts |
| MEP checks | Unconnected, Sloped/Flat |
| Geometry checks | In-Place Families, Duplicates |
| Result count | Displays number of flagged elements; click to select them |
| APPLY button | Run the selected check |
QA Check Types
Section titled “QA Check Types”| Check | Description |
|---|---|
| Unhosted Elements | Elements that should have a host but don’t (e.g., doors without walls) |
| Orphaned Hosts | Host elements whose hosted elements have been deleted |
| Unconnected MEP | MEP elements with open connectors |
| Sloped/Flat Pipes | Pipes that are sloped or flat based on the slope threshold |
| In-Place Families | In-place family instances that may need conversion |
| Duplicates | Elements in the same location within the duplicate tolerance |
Keyboard Shortcuts
Section titled “Keyboard Shortcuts”When the dialog has focus, these shortcuts provide rapid access:
Colorization Modes
Section titled “Colorization Modes”| Key | Action |
|---|---|
C | Select Category mode |
T | Select Type mode |
F | Select Family mode |
W | Select Workset mode |
P | Select Phase mode (opens dropdown) |
L | Select Level mode |
M | Select MEP System mode |
N | Select Connected Run mode |
Actions
Section titled “Actions”| Key | Action |
|---|---|
S | Clear Selected |
R | Clear All |
Enter | Apply |
Escape | Close dialog |
Options & Settings
Section titled “Options & Settings”| Option | Description | Default |
|---|---|---|
| Category Mode | V/G Category (fast, applies at category level) or Per Element (precise, applies to individual elements) | V/G Category |
| Transparency | Override transparency level (0-100%) | 0% |
| Slope Threshold | Minimum rise to count a pipe as sloped in QA Checker | 0 (any slope) |
| Duplicate Tolerance | Maximum distance to flag elements as duplicates | 0 (exact match) |
| Phase Mode | Phase Created or Phase Demolished | Created |
| MEP System Group By | Classification, Type, or Name | Name |
| Connected Run Scope | All MEP, Ducts Only, Pipes Only, or Conduits Only | All MEP |
Use Cases
Section titled “Use Cases”Coordination Meetings
Section titled “Coordination Meetings”Color elements by Workset to visualize team ownership, or by Level to see floor assignments at a glance. This makes it easy to discuss scope boundaries and identify coordination issues.
MEP Design Review
Section titled “MEP Design Review”Use Connected Run coloring to trace duct and pipe paths through the model. Use MEP System coloring to verify that elements are assigned to the correct systems.
Phase Documentation
Section titled “Phase Documentation”Color by Phase Created or Phase Demolished to review phasing during design reviews or to prepare phasing diagrams.
Model Cleanup
Section titled “Model Cleanup”Run QA checks to find and fix:
- Unhosted elements - Doors or windows without hosts
- Duplicates - Accidentally placed overlapping elements
- Orphaned hosts - Panels or Fixtures with removed hosts
- Unconnected MEP - Pipes or ducts with open ends
Quick Markup
Section titled “Quick Markup”Use Quick Color during design reviews to rapidly mark elements for discussion, flag elements with issues, or track QA/QC status.
Tips & Best Practices
Section titled “Tips & Best Practices”-
V/G vs Per Element mode - Use V/G Category mode (default) for best performance. Switch to Per Element mode only when you need to color individual elements of the same category differently
-
QA workflow - Run one check at a time, review the results, then clear before running another check. This keeps the visual feedback clear
-
Combine with isolation - Color elements to identify groups, then use Isolate by Filter to focus on specific categories or types for detailed work
-
Connected Run for conduits - MEP System coloring excludes conduits because they don’t have meaningful system types. Use Connected Run instead to trace conduit paths
-
Keyboard shortcut - Assign a keyboard shortcut to Color Tools (Revit Options > Keyboard Shortcuts) for faster access
-
Session memory - The dialog remembers its position and settings during your Revit session. Drag it to a convenient location and your preferences persist until you close Revit
Limitations
Section titled “Limitations”| Limitation | Details |
|---|---|
| Workset coloring | Only available for workshared (central file) models |
| Per-Element mode performance | Per-element override mode can be slower on large models with many elements |
| Duplicates check performance | Duplicate detection may be slow on very large models (10,000+ elements) |
| MEP System coloring | Conduits are excluded because they don’t have meaningful system types; use Connected Run instead |
| View scope | All colorization and QA checks operate on the active view only |
Troubleshooting
Section titled “Troubleshooting”Colors don’t appear
Section titled “Colors don’t appear”Cause: Another view override (view template, filters) may be blocking the color override.
Solution: Check if the view has a view template applied that controls graphic overrides. You may need to unlock graphic overrides in the template or use a different view.
Workset option is grayed out
Section titled “Workset option is grayed out”Cause: The project is not workshared.
Solution: Enable worksharing in your project to use workset-based coloring.
QA Checker finds no issues
Section titled “QA Checker finds no issues”Cause: The selected check type doesn’t apply to elements in the current scope, or there are no issues.
Solution: Try a different scope (Active View vs Selection) or verify that the element types you’re checking for exist in the view.
Performance is slow
Section titled “Performance is slow”Cause: Per-Element mode or Duplicates check on large models.
Solutions:
- Switch to V/G Category mode for colorization
- Reduce the scope by selecting specific elements before running QA checks
- For duplicate checking, limit the selection to specific areas
Connected Run shows unexpected colors
Section titled “Connected Run shows unexpected colors”Cause: Elements that appear connected may not be physically connected in the Revit model.
Solution: Use Revit’s built-in “Show Disconnects” feature to verify actual connectivity.
Phase coloring shows all elements the same color
Section titled “Phase coloring shows all elements the same color”Cause: All elements in the view were created in the same phase.
Solution: Verify that your model uses multiple phases. Try switching between Phase Created and Phase Demolished modes.
Related Tools
Section titled “Related Tools”- Quick Color - Radial marking menu for rapid color assignment to selected elements
- Export VG - Save and share visibility/graphics settings
- Smart Selection - Select similar elements to prepare for coloring
- Isolate by Filter - Isolate elements by category, type, or other criteria