Align View to Edge
Align View to Edge lets you quickly reorient views to match the direction of any linear edge in your model. This is especially useful when working with angled or rotated geometry that does not align with the project’s cardinal directions, such as skewed buildings, rotated equipment, or bridge alignments.
Getting Started
Section titled “Getting Started”Find Align View to Edge on the Amorphous ribbon tab in the View Tools panel.

The button is enabled when your active view is one of:
- Floor Plan, Ceiling Plan, Area Plan, or Engineering Plan (not a view template)
- Section view (not an elevation or view template)
- 3D view (not a view template)
Features
Section titled “Features”- Multi-view type support - Works with plan views, section views, and 3D views
- Two alignment modes for plans - Choose to duplicate the view or modify it in place
- Automatic view cleanup - Keeps only the 3 most recent edge-aligned views to prevent clutter
- Smart crop box handling - Automatically expands crop boxes to include the selected element
- View template handling - Automatically detaches view templates when necessary to enable rotation
- Visual guidance - Shows an instruction bar during edge selection
How to Use
Section titled “How to Use”Plan Views
Section titled “Plan Views”- Open a plan view - Floor, ceiling, area, or engineering plan
- Click “Align View to Edge” on the ribbon
- Select an edge - Click on any edge in the model you want to align to
- Choose alignment mode in the dialog that appears:
- Duplicate View (default): Creates a new view aligned to the edge, keeping the original unchanged
- Modify Active: Rotates the current view in place
- Click “Align View” - The view rotates so the selected edge becomes horizontal
Section Views
Section titled “Section Views”- Open a section view - Must be a section, not an elevation
- Click “Align View to Edge” on the ribbon
- Select an edge - Click on any edge visible in the section
- A new section view is created with the selected edge aligned horizontally
3D Views
Section titled “3D Views”- Open a 3D view - Any non-template 3D view
- Click “Align View to Edge” on the ribbon
- Select an edge - Click on any linear edge in the model
- The view reorients to a top-down perspective with the selected edge pointing right, then zooms to fit the element
User Interface
Section titled “User Interface”Alignment Mode Dialog (Plan Views)
Section titled “Alignment Mode Dialog (Plan Views)”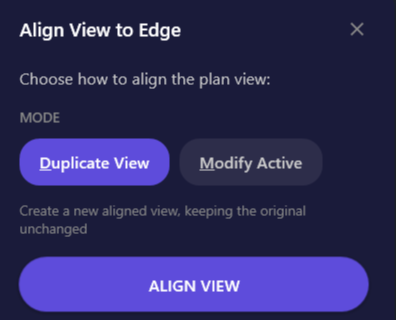
When aligning a plan view, this dialog lets you choose how the alignment is applied.
| Element | Description |
|---|---|
| Duplicate View | Creates a new view aligned to the edge, preserving the original |
| Modify Active | Rotates the current view in place |
| ALIGN VIEW | Applies the selected mode and aligns the view |
Keyboard shortcuts:
D- Select Duplicate View modeM- Select Modify Active modeEnter- Apply the selected modeESC- Cancel
Instruction Bar
Section titled “Instruction Bar”
When the command is active, an instruction bar appears at the top of the Revit window prompting you to select an edge. Press ESC to cancel the operation.
Use Cases
Section titled “Use Cases”| Scenario | Description |
|---|---|
| Angled buildings | When a building is rotated relative to project north, align views to the building’s actual orientation |
| Skewed elements | Visualize elements placed at angles (angled walls, rotated equipment, etc.) |
| Bridge/Infrastructure | View bridge decks or infrastructure elements along their alignment |
| Sloped sections | Create section views aligned to sloped or angled elements |
| Drafting | Create views that match a specific edge direction for modeling or documentation |
Tips & Best Practices
Section titled “Tips & Best Practices”- Preserving original views - Use “Duplicate View” mode for plan views if you need to keep the original view unchanged. This is especially important when the view is already placed on a sheet, as modifying it in place would affect your sheet layout.
- Finding edge-aligned views - Edge-aligned views are named with timestamps (e.g.,
Level 1_EdgeAlignedPlan_20240115_143022) for easy identification in the Project Browser - Keyboard shortcut - Assign a shortcut to Align View to Edge for faster access (Revit Options > Keyboard Shortcuts)
Limitations
Section titled “Limitations”| Limitation | Details |
|---|---|
| Elevation views not supported | Only section views work with this tool, not elevations |
| Section views always create new views | Unlike plan views, section alignment cannot modify in place |
| 3D orientation is top-down only | The 3D alignment always orients to a top-down perspective |
| Parallel edges | If the selected edge is parallel to the view direction (e.g., a vertical edge in a plan view), the alignment will fail |
| View templates block rotation | Templates are automatically detached for plan views |
Troubleshooting
Section titled “Troubleshooting””The selected edge is parallel to the view direction”
Section titled “”The selected edge is parallel to the view direction””This error occurs when you select an edge that cannot be projected onto the view plane (e.g., selecting a purely vertical edge in a plan view). Select a different edge that has a horizontal component.
View template was detached
Section titled “View template was detached”Plan views with view templates cannot be rotated while the template is applied. The tool automatically detaches the template to allow rotation. You can reapply a template manually after alignment if needed.
Old edge-aligned views are being deleted
Section titled “Old edge-aligned views are being deleted”The add-in automatically cleans up old edge-aligned views, keeping only the 3 most recent. Views that are placed on sheets cannot be auto-deleted and will generate a warning instead.
Crop box is larger than expected
Section titled “Crop box is larger than expected”The tool automatically expands the crop box to include the element whose edge you selected, plus padding. For section views, only width and height are expanded; the depth (far clip) is preserved.
Button is disabled
Section titled “Button is disabled”The button is only enabled for plan views, section views (not elevations), and 3D views. View templates are also excluded. Ensure your active view is a supported type.
Related Tools
Section titled “Related Tools”- Smart Section Box - Create section boxes that align to element geometry
- Section Box by Edge - Create section boxes aligned to a picked edge
- View from Section Box - Create 2D views from section box extents
- Rotate Active View - Manually rotate the active view by any angle