View from Section Box
View from Section Box transforms the workflow of creating 2D documentation from 3D models. Instead of manually setting up section views or floor plans, simply click on a highlighted face of an active section box to instantly generate a properly cropped and oriented 2D view. This tool pairs especially well with Smart Section Box, which creates intelligently oriented section boxes around your selected elements.
Getting Started
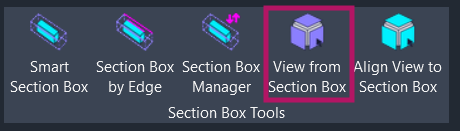
Section titled “Getting Started”Find View from Section Box on the Amorphous ribbon tab in the Section Box Tools panel.
The button is enabled when:
- You’re in a 3D view with an active section box
- The section box is visible in the current view
Features
Section titled “Features”- Visual face selection - Semi-transparent purple faces highlight all sides of the section box for intuitive direction selection
- Section views - One-click creation of section views from Front, Back, Left, Right, or Top faces
- Floor plan creation - Generate floor plans from the top face with customizable view range settings
- Interactive preview - Movable preview planes show cut plane and bottom clip positions before creating floor plans
- Orientation options - Choose between section box rotation or world axis (north-up) alignment for floor plans
- Automatic view management - Views are automatically named and managed; oldest views are deleted when limit is reached
How to Use
Section titled “How to Use”Creating Section Views
Section titled “Creating Section Views”- Activate the command - Purple semi-transparent faces appear on all five sides of the section box
- Click a face - Select the face corresponding to the viewing direction you want (Front, Back, Left, Right, or Top)
- View created - A new section view is created and opened automatically
The section view will be:
- Cropped to match the section box extents
- Named with your username and timestamp (e.g.,
JohnDoe_AutoFromSectionBox_20250128_143022) - Set to 1/8” = 1’-0” scale with Fine detail level
Creating Floor Plans
Section titled “Creating Floor Plans”- Click the top face - The Floor Plan Options dialog opens
- Configure orientation - Choose Section Box (rotated) or World Axis (north-up)
- Set cut plane - Adjust where elements are cut (10-100% of section box height)
- Set bottom clip - Define view depth from bottom (0-90% of section box height)
- Preview - Click PREVIEW to see colored planes showing positions
- Apply - Click APPLY to create the floor plan
User Interface
Section titled “User Interface”Visual Face Selection
Section titled “Visual Face Selection”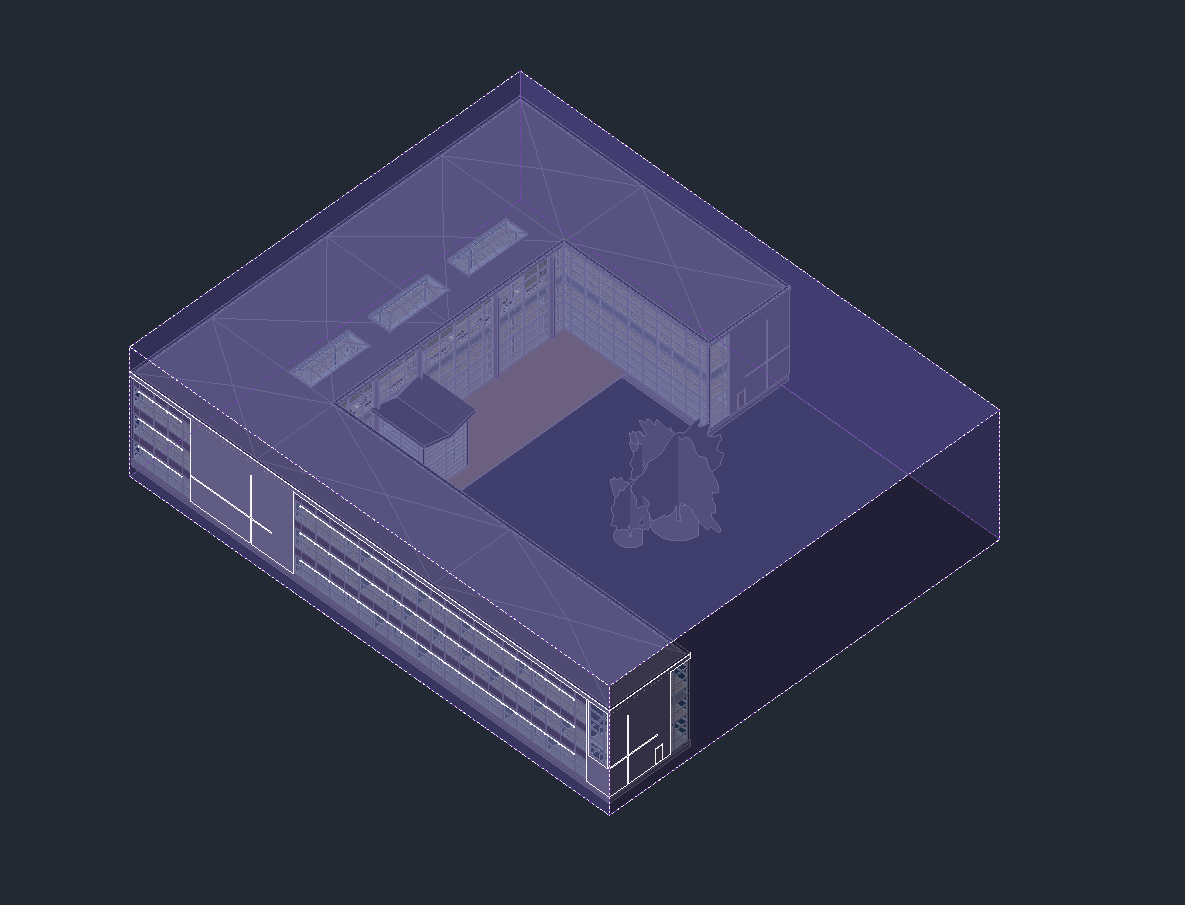
When you activate the command, purple semi-transparent faces appear on all sides of the section box. Simply click the face that corresponds to the viewing direction you want:
| Face | Creates |
|---|---|
| Front | Section view looking at the front |
| Back | Section view looking at the back |
| Left | Section view looking from the left |
| Right | Section view looking from the right |
| Top | Opens Floor Plan Options dialog |
An instruction bar appears at the top of the Revit window guiding you to click a face.
Floor Plan Options Dialog
Section titled “Floor Plan Options Dialog”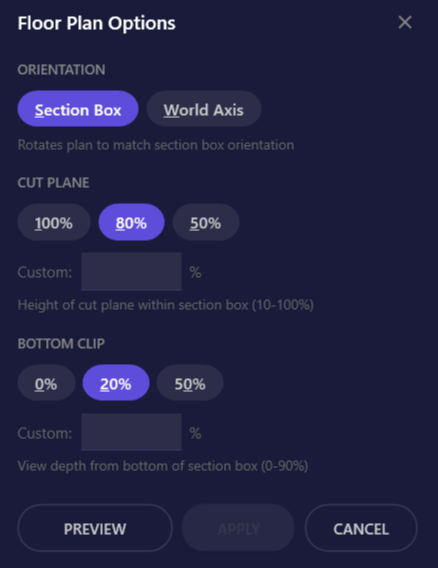
This dialog appears when you click the top face to create a floor plan.
| Element | Description |
|---|---|
| Orientation: Section Box | Rotates the plan view to match the section box rotation angle |
| Orientation: World Axis | Plan aligned to project north (standard orientation) |
| Cut Plane | Height within the section box where elements are cut (10-100%) |
| Bottom Clip | View depth from the bottom of the section box (0-90%) |
| Custom fields | Enter precise percentage values when presets don’t match your needs |
| PREVIEW | Shows colored preview planes in the 3D view |
| APPLY | Creates the floor plan with current settings |
| CANCEL | Closes dialog without creating a view |
Keyboard shortcuts:
| Key | Action |
|---|---|
S | Select Section Box orientation |
W | Select World Axis orientation |
1 | Set Cut Plane to 100% |
8 | Set Cut Plane to 80% |
5 | Set Cut Plane to 50% |
0 | Set Bottom Clip to 0% |
2 | Set Bottom Clip to 20% |
Enter | Preview (if not active) or Apply (if preview active) |
ESC | Cancel and close dialog |
Preview Planes
Section titled “Preview Planes”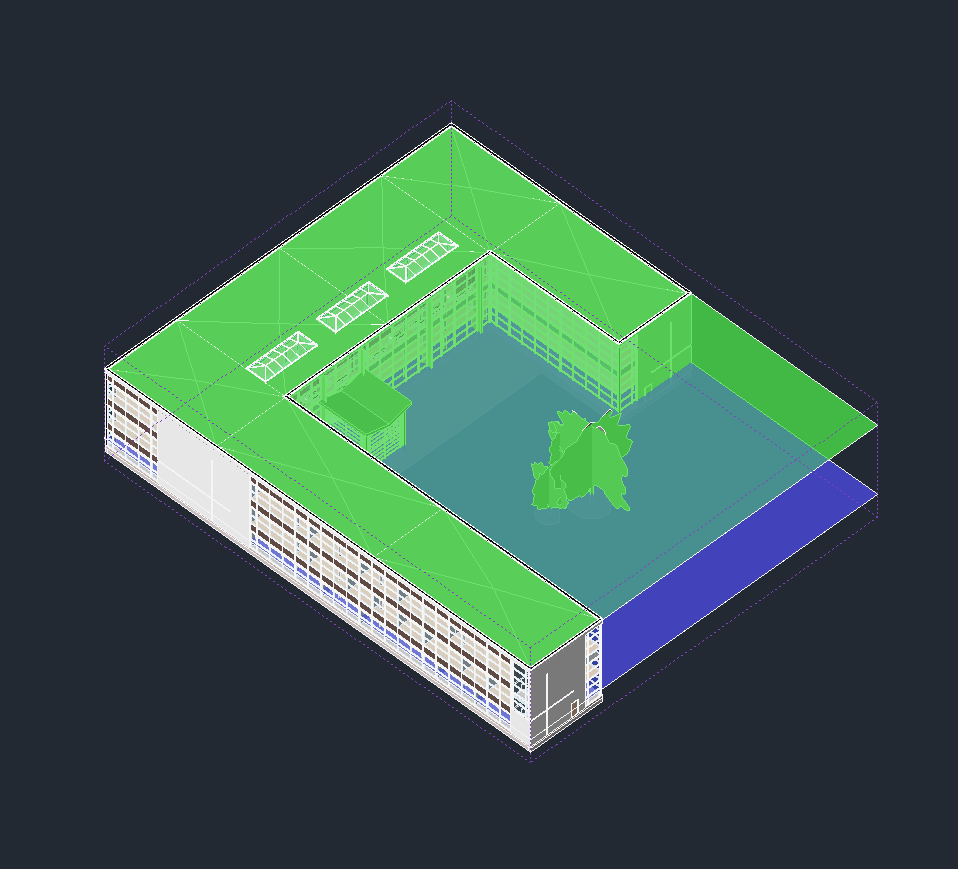
After clicking PREVIEW, colored planes appear in the 3D view:
| Plane | Color | Description |
|---|---|---|
| Cut Plane | Green | Shows where elements will be cut in the floor plan |
| Bottom Clip | Blue | Shows the bottom extent of visibility |
You can:
- Adjust values in the dialog and click UPDATE PREVIEW to see changes
- Move the preview planes vertically in Revit using the Move command, then click UPDATE PREVIEW to sync the dialog values
After the floor plan is created, you can modify the view range visually using Interactive View Range.
Use Cases
Section titled “Use Cases”Quick Section Documentation
Section titled “Quick Section Documentation”Create multiple section views from a section box for coordination meetings or documentation:
- Create a section box around an area of interest using Smart Section Box
- Run View from Section Box
- Click Front to get one section
- Run the command again and click Left for a perpendicular section
Floor Plan Extraction
Section titled “Floor Plan Extraction”Generate plan views at specific elevations from 3D views of complex areas:
- Set up a section box around a multi-story area
- Click the top face to open Floor Plan Options
- Adjust cut plane to the desired floor level
- Preview to verify, then Apply
Rotated Plans
Section titled “Rotated Plans”Create floor plans aligned to building geometry for angled buildings, bridges, or rotated wings:
- Use Smart Section Box on an angled element to create a rotated section box
- Run View from Section Box and click the top face
- Select Section Box orientation to maintain the rotation
- Apply to create a plan aligned to the building geometry
MEP Coordination
Section titled “MEP Coordination”Quick plan cuts at various heights to review ductwork, piping, or conduit routing:
- Set up a section box around the MEP area
- Create a floor plan with cut plane at 50% for mid-height review
- Create another at 80% for ceiling-level systems
- Compare the views to verify routing coordination
Options & Settings
Section titled “Options & Settings”View Properties
Section titled “View Properties”New views are created with these default properties:
| Setting | Value |
|---|---|
| Scale | 1/8” = 1’-0” (96) |
| Detail Level | Fine |
| Crop Region | Enabled, matching section box extents |
Automatic View Management
Section titled “Automatic View Management”To prevent clutter, the add-in limits auto-created views per user:
| Setting | Value |
|---|---|
| Maximum views | 3 per user |
| Naming pattern | {Username}_AutoFromSectionBox_{Date}_{Time} |
| Cleanup | Oldest view deleted when limit reached |
Tips & Best Practices
Section titled “Tips & Best Practices”- Keyboard shortcut - Assign a shortcut to this command for faster access when documenting multiple views
- Combine with Smart Section Box - Use Smart Section Box to quickly create the section box, then generate 2D views from it
- Preview before applying - Always use the Preview button for floor plans to verify cut plane and bottom clip positions
- Rotated section boxes - For section boxes rotated in 3D, floor plans can match the rotation by selecting “Section Box” orientation
- Custom percentages - Use the custom input fields when preset values don’t match your needs
- Preview plane movement - After clicking Preview, you can move the colored planes vertically in Revit using the Move command, then click UPDATE PREVIEW to sync the dialog values
- No section box? - If you don’t need a section box, use View from Face to create 2D views directly from any element face
Limitations
Section titled “Limitations”| Limitation | Details |
|---|---|
| 3D view required | The command only works from a 3D view with an active section box |
| Floor plans require levels | Floor plans are associated with the nearest existing level to the section box elevation |
| Bottom face not supported | Only Top, Front, Back, Left, and Right faces can generate views |
| Preview planes are temporary | Preview planes are automatically cleaned up when the dialog closes |
Troubleshooting
Section titled “Troubleshooting”Button is disabled
Section titled “Button is disabled”The button is only enabled when you’re in a 3D view with an active section box. Make sure:
- You’re in an orthographic 3D view (not a perspective view)
- The section box is enabled in the view properties
- The section box is visible
Purple faces don’t appear
Section titled “Purple faces don’t appear”If the visual faces fail to create:
- Ensure you have sufficient permissions to create elements in the model
- Check that the section box is valid and properly defined
- Try toggling the section box off and on again
Floor plan not at expected level
Section titled “Floor plan not at expected level”Floor plans are associated with the nearest existing level to the section box elevation. If your section box spans unusual elevations:
- Verify that appropriate levels exist in the project
- Consider adjusting the section box vertical position
Preview planes persist after canceling
Section titled “Preview planes persist after canceling”In rare cases, preview planes may persist. They will be automatically cleaned up:
- On the next command run
- When Revit is closed
View naming conflicts
Section titled “View naming conflicts”If views with similar names exist:
- The add-in uses timestamps to ensure unique names
- Old auto-created views are automatically deleted when the limit (3) is reached
Related Tools
Section titled “Related Tools”- Smart Section Box - Create intelligently rotated section boxes that align to your selected elements
- Section Box by Edge - Create section boxes aligned to a picked edge
- Align View to Section Box - Orient 3D view to match section box orientation
- Section Box Manager - Save, recall, and manage section box states
- Interactive View Range - Visually adjust view range planes for floor plans